
First, let's review. Here's the reference picture I was given.

First thing I do for portraits is to take the reference image or images into Photoshop to crop or pull out details that might be obscure in a photo due to exposure or focus issues. Here, I've just cropped it to the proportions I'm going for: square. I still have some work to do.
For instance, the nose is a dark blob, so I work that up so I can see some subtle reflected light outlining the nostrils. I also managed to pull out some light in the irises, which were dark and colorless in the original photo. I thought the two collars were too busy, so I stamped one out, leaving just her embroidered collar. The original photo is pretty fuzzy, which I managed to tighten up enough for my purposes, but there's only so much you can do with that. Stuff like that.
 After all, I'm not trying to make it a great photo, I'm just trying to give myself a good reference, so I can get the best likeness possible.
Next, I make a drawing at the final size, and transfer that to my canvas with the use of transfer paper. Handy stuff! It's like an old-fashioned carbon paper, except it's a non-waxy coating, so it doesn't repel paint. (You can use it over and over again, and it makes an interesting collection of history, with impressions of pieces I did years and years ago still visible.)
You can't really see it very well in photos, but here I've glazed in the first messy wash of background color, and you can still make out just a bit of the blue drawing.
 Next, I want to do an underpainting which will help me establish the darker areas of the painting. Lucy is a pretty pale hound, with just the really dark bits of her eyes, mouth and nose, so I kept my underpainting pretty washy to begin with. I also dropped in a little yellow in the eye area to begin the layers that will make her eyes glow to life.
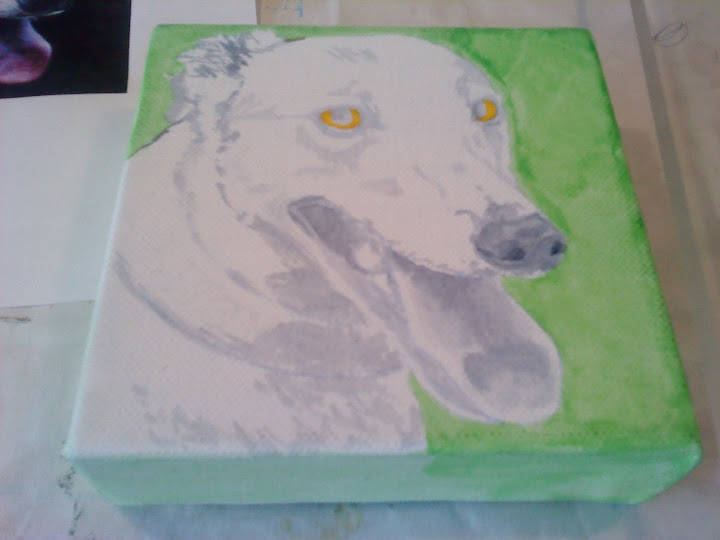 A little more into the shadows, and working up the eyes and darker features ...
 I'm starting to want some color here, so I start to wash in the first layers of warmer tones in the eyes and mouth. I'm pretty sure I even have a very light wash of golden yellow or naples yellow on her fur here, too.
 After that, I was able to dive in and work up the delicate shades of the fur, model the mouth details more, and continue to pull it all together.
 Almost done.
There are shading and highlighting details to tighten up, with thin layers of thalo blue, Payne's gray and Hooker's green in the darker areas, and titanium white warmed with Naples yellow, or cooled with the thalo blue.
After this point, I daubed in Hooker's Green with a glazing medium to get the final leafy feel to the background, topping up with some more transparent glazes of chrome green light in the brighter areas.

Done!
And you know what? I need new brushes! I've been using my poor watercolor brushes with acrylics on canvas, and they're shedding broken hairs all over the place. No good. They all got a good warm bath with brush cleaner and warm water, which softened them back up nicely, but they all have a horrible case of the frizzes!
To other artists: I've evolved my own system for managing wetness, but I'd be interested in anyone else's if they've got a good improvement. Mine goes like this.
I've got two water jars. One is for dirty first-rinse brushes, and the other is to really get them clean enough to change colors completely, or to dip into for wetting paint. I use a glass pallet, and a little squirt bottle (some used up pet med thing) to drip on water to keep paints workable. Once I get my brush loaded, sometimes it's just got too much water in it, so I use a sponge to press the root of the hairs against to soak up excess, which I keep right on my table. I also use the sponge to dry and shape my brushes after I rinse them. (Never leave brushes standing in the water! They get bent, and the ferrules might even rust, or the wood handles swell, chipping off the paint in a rough messy mess.) When I need to take a break, I use little cut sponges soaked in water to place on my pallet amongst the paint blobs, then cover them with a cardboard box which I've lined with a plastic bag and edge-taped with duct tape. It works pretty well to keep paints workable, sometimes for a couple days even. I use a razor paint scraper to clean the smeary unuseable paint, and a scrub sponge to get the last bits off my pallet.
I like using the sponges since you can use them over and over, and they don't shed fibres like paper towels. I like the glass since it doesn't stain, and doesn't chew up my brushes prematurely like something more textured or porous might. I like using the little squirt bottle rather than a spray bottle because I can control it better. I don't always need everything in a 4"+ radius dripping wet. Just maybe that one color I won't be back to right away.
Anybody have any improvements we can all use?
I hope you enjoyed this little progression, and apologize for the photos. I just took them with my phone camera as I remembered to. :D
It was very cool to see it go through the process! Thanks for sharing!
ReplyDeleteTrying to reply in another browser. Let's see if this works! ;P
ReplyDeleteThanks, houndstooth! I always enjoy seeing other artists' process, so I thought I'd share mine. Glad you liked it. :)